I believe everyone has their own method to their Madness. Whether it is folding laundry, cleaning or even quilting. This is what I do. It may not be the correct way and definitely not the only way, but this is a little insight into my Madness. 🙂
When it comes to coming up with quilt designs, I stick to one guiding principle…”does it fit?” I say it in my head and I say it out loud. My goal is always to create quilt designs that do not compete with the quilt top, piecing or applique. Like the quilt was born that way…a partnership…marriage of sorts. The quilting and top are intertwined in a way that you cannot tell where one ends and one begins. Of course I want my quilting to show, but I never want the quilting to be all you see. My hope is to create designs that elevate a quilt, not conquer it.
My best ideas for designs usually come once the quilt is loaded. Sometimes the quilting just screams at me, other times the top makes me guess a little. In those instances, I like to lay the quilt out and stare at it. I like to squint and/or let my eyes fall out of focus as I stare at it. This can help you see secondary shapes or designs appear. It also helps you see what really stands out. When I started quilting, Jamie Wallen taught me to squint at tops to pick out the best thread color, but I found it works great for designing too! In the case of Settler’s Puzzle, the white areas pop out at you, but I almost could see circular and curving shapes too. Not all those 90 degree, boxy shapes when you first glance at it.
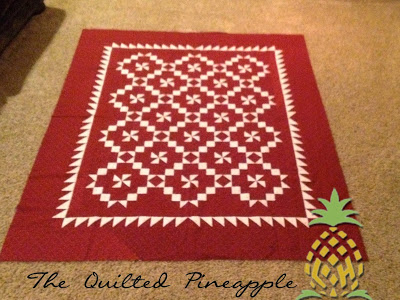
The top is a repeating design, traditional and the red is a reproduction. Those all factor into designing as well. I have worked with enough dark reproductions to know that small, heavy designs are not going to show…like background fillers. Unless there is a quilted motif…like feathers with fill around the feathers. Sooooo, I thought I would create a design that would play up those curving shapes and a design that repeats.
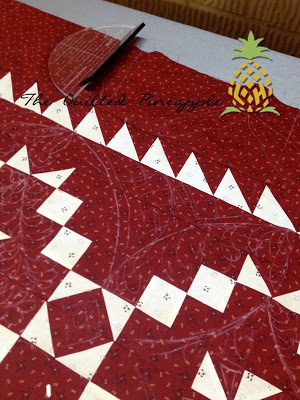
My favorite way to audition designs is to draw them right on the top with plain old white chalk. I can easily wipe it away. Repeating that curved crosshatch design around the quilt creates a look of scallops.
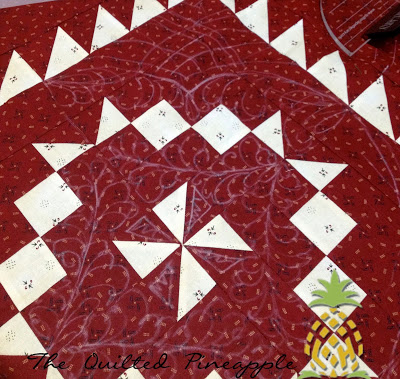
In order to make the design continuous, the corners also have a curved crosshatch design. Feathers complement the design and create a bridge from one area to the next.
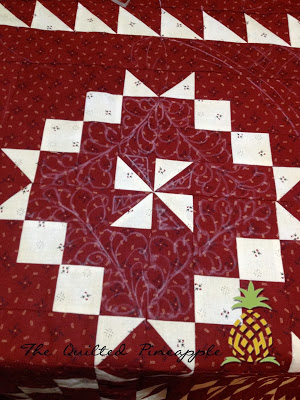
Feather spines with a soft curve mimic the circular shape, framing those white chains and pinwheels that were popping off the top when you were staring at it. 🙂 Remember? So repeating the curved lines/shapes and feathers, just like the piecing design repeats. Quilting and piecing playing off one another so that “it fits.”
If I need to find inspiration for a quilt like this, I look to antique quilts for ideas. Pinterest, books or eBay can be a great source for inspiration. Often this will get my creative cap working.
Another way I like to audition designs, but I do not do it as often is to take a photo of the top, make a photocopy and draw designs on the photocopy. I did this for a quilt like Portland Rose seen here.
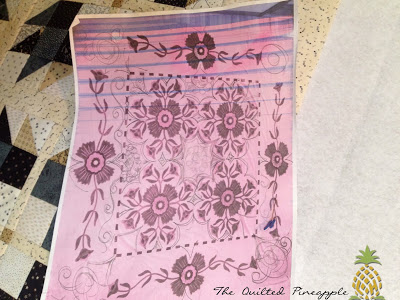
Portland Rose is a huge quilt with ample open space for quilting. In this case, it really helped with the design by drawing them out a little. As you can see, it is a bunch of scribbles mostly, but it gave me a general layout. When I do this, I like to fold the paper in fourths, so I section it up. It becomes a lot less intimidating to design a section, then a giant quilt all at once. 🙂
I hope you find my tips aka ramblings helpful. 🙂